🔥알림🔥
① 테디노트 유튜브 -
구경하러 가기!
② LangChain 한국어 튜토리얼
바로가기 👀
③ 랭체인 노트 무료 전자책(wikidocs)
바로가기 🙌
④ RAG 비법노트 LangChain 강의오픈
바로가기 🙌
⑤ 서울대 PyTorch 딥러닝 강의
바로가기 🙌
[PyTorch] RNN Layer 입출력 파라미터와 차원(shape) 이해
이번 포스팅에서는 pytorch의 rnn 레이어의 input 차원, output 차원, hidden dimension, num_layers 파라미터를 직접 확인하면서 동작 결과를 눈으로 직접 확인해 보고 코딩시 적절하게 활용하는 방법에 대하여 알아보도록 하겠습니다.
RNN의 동작 원리는 생략하고, 코딩시 입출력 shape에 중점을 두었습니다.
PyTorch RNN 파라미터
- 참고: 공식문서
class torch.nn.RNN
- input_size – 입력해 주는 특성 값의 개수 입니다. 만약 feature의 개수가 1이라면
input_size=1, 입력 feature 개수가 7개면input_size=7을 입력합니다. - hidden_size – hidden state의 개수를 지정합니다. 보통 arbitrary 합니다.
- num_layers – RNN 레이어를 겹겹이 쌓아올릴 수 있습니다. RNN 레이어를 쌓아 올리는 것을
stacking RNN이라고도 합니다. 만약, 2개층을 겹겹이 쌓아올린다면num_layers=2로 설정하면 됩니다. 기본 값:1 - batch_first – 입력으로 받는 데이터의 shape중 첫 번째 차원을 batch로 간주할 것인지를 설정합니다. 일반적으로 pytorch에서 데이터 전처리시 batch를 첫번째 차원으로 지정하기 때문에 많은 케이스에서
batch_firtst=True로 지정함을 볼 수 있습니다.True이면 입력 및 출력 텐서가 (seq, batch, feature) 대신 (batch, seq, feature)로 제공됩니다. 이는 hidden 또는 cell state에는 적용되지 않습니다. 기본값:False - dropout – 0이 아닌 경우, 마지막 레이어를 제외한 각 RNN 레이어의 출력에 드롭아웃 레이어를 도입하며, 드롭아웃 확률은
dropout과 같습니다. 기본값:0 - bidirectional –
True로 설정된 경우, 양방향 RNN을 적용합니다. 기본 값:False
RNN 생성 및 샘플 데이터 생성
RNN 생성
# 모듈 import
import numpy as np
import torch
import torch.nn as nn

input_size = 1  # 입력 데이터 특성 차원
hidden_dim = 10 # hidden state 차원
n_layers = 2    # stacking layer 개수

rnn = nn.RNN(input_size, hidden_dim, n_layers, batch_first=True)
rnn
# 출력
# RNN(1, 10, num_layers=2, batch_first=True)
샘플 데이터 생성
# 20개의 시퀀스 생성
seq_length = 20

time_steps = np.linspace(0, np.pi, seq_length*input_size)
print(time_steps.shape)
# 출력
# (20,)

data = np.sin(time_steps)
data.resize((seq_length, 1))
print(data.shape)
# 출력
# (20, 1)

# 배치 차원 추가(0번째)
input_data = torch.Tensor(data).unsqueeze(0).shape
print('Input size: ', test_input.size())
# Input size:  torch.Size([1, 20, 1])
RNN 입출력, hidden 차원 이해
unsqueeze(0): 0번째 차원 추가. batch 차원을 추가하기 위함
print(torch.Tensor(data).shape)
# torch.Size([20, 1])

print(torch.Tensor(data).unsqueeze(0).shape)
# torch.Size([1, 20, 1])

print(torch.Tensor(np.expand_dims(data, 0)).shape)
# torch.Size([1, 20, 1])
RNN 레이어 input, output, hidden 차원 이해하기
# 배치 차원 추가(0번째)
input_data = torch.Tensor(data).unsqueeze(0)
print('Input: ', input_data.size())
# input_data 차원
# input: [1, 20, 1]
# Input: [(batch_size, seq_length, input_features)]
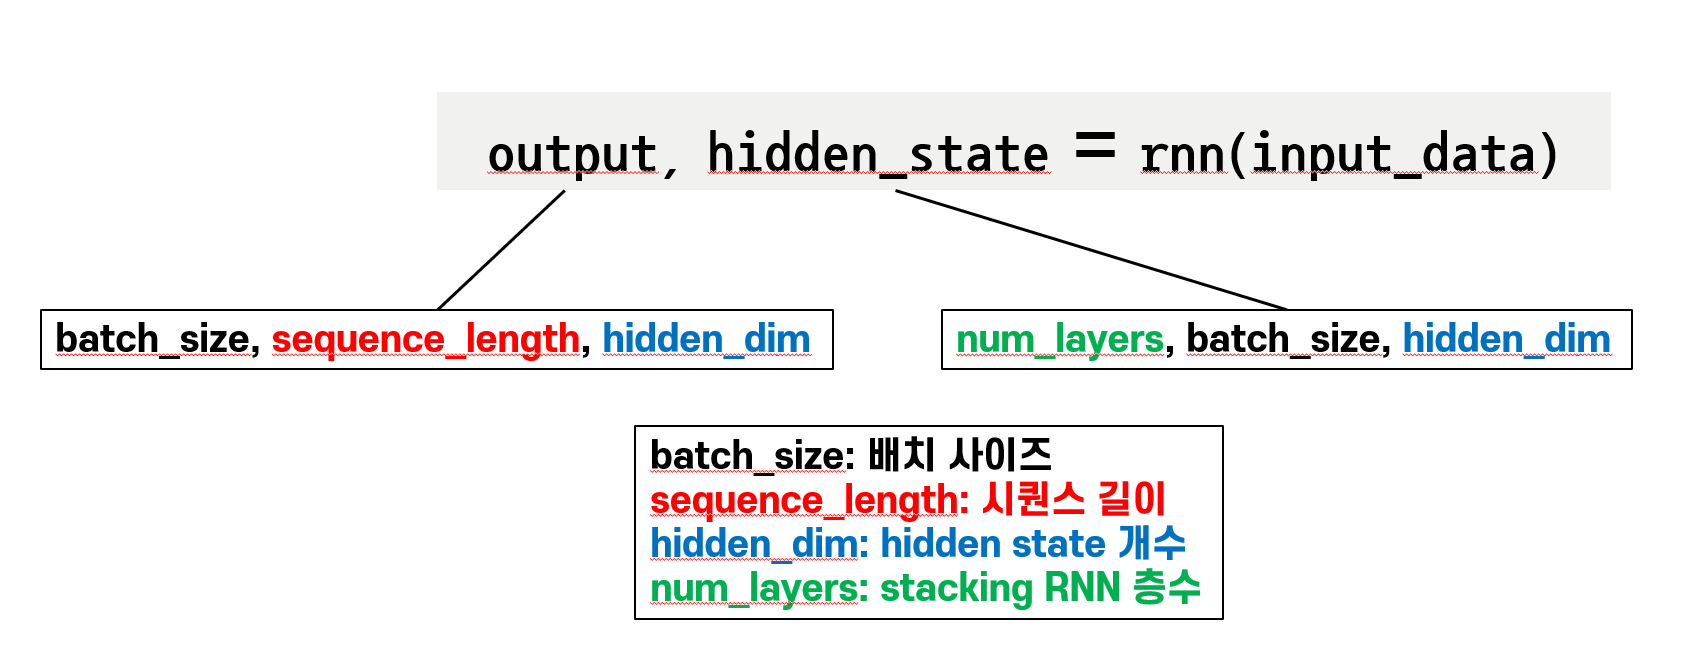
# RNN 출력(output, hidden_state)
output, hidden_state = rnn(input_data, None)
# rnn output, hidden_state 차원
# output: [1, 20, 10]
# output: [batch_size(1), sequence_length(20), hidden_dim(10)]
print('Output: ', output.size())
# Output: torch.Size([1, 20, 10])
# hidden: [2, 1, 10]
# hidden: [num_layers(2), batch_size(1), hidden_dim(10)]
print('Hidden State: ', hidden_state.size())
# Hidden State: torch.Size([2, 1, 10])
input_size=3, hidden_dim=15, num_layers=2 로 변경시
input_size = 3  # 입력 데이터 특성 차원
hidden_dim = 15 # hidden state 차원
n_layers = 2    # stacking layer 개수

rnn = nn.RNN(input_size, hidden_dim, n_layers, batch_first=True)

# 20개의 시퀀스 생성
seq_length = 20

time_steps = np.linspace(0, np.pi, seq_length*input_size)
print(time_steps.shape)
# (60,)

data = np.sin(time_steps)
data.resize((seq_length, input_size))
print(data.shape)
# (20, 3)

# 배치 차원 추가(0번째)
input_data = torch.Tensor(data).unsqueeze(0)
print('Input size: ', input_data.size())
# torch.Size([1, 20, 3])

output, hidden_state = rnn(input_data, None)

# output shape: [batch_size, sequence_length, hidden_dim]
print('Output: ', output.size())
# Output:  torch.Size([1, 20, 15])

# hidden shape: [num_layers, batch_size, hidden_dim]
print('Hidden State: ', hidden_state.size())
# Hidden State:  torch.Size([2, 1, 15])
댓글남기기