🔥알림🔥
① 테디노트 유튜브 -
구경하러 가기!
② LangChain 한국어 튜토리얼
바로가기 👀
③ 랭체인 노트 무료 전자책(wikidocs)
바로가기 🙌
④ RAG 비법노트 LangChain 강의오픈
바로가기 🙌
⑤ 서울대 PyTorch 딥러닝 강의
바로가기 🙌
[tensorflow] 오토인코더 구현 (MNIST)
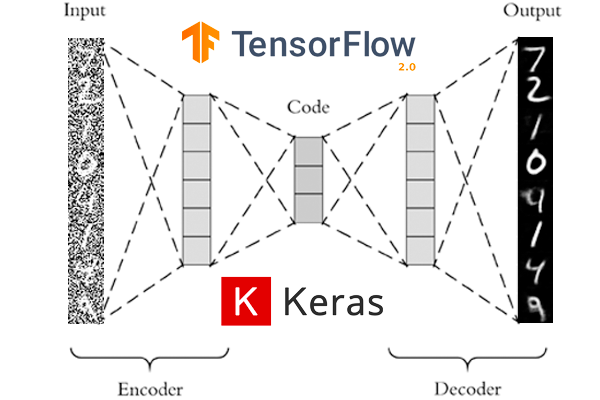
이번 포스팅에서는 오토인코더의 기본 개념에 대하여 알아보고, TensorFlow 2.0으로 오토인코더(Autoencoder)를 구현해 보겠습니다.
오토인코더란?
오토인코더는 고차원의 정보를 압축해 주는 인코더와 압축된 정보를 다시 원래 정보로 돌려주는 디코더로 이루어져 있습니다.

원본데이터는 인코더를 거쳐 압축된 정보로 변환한뒤, 다시 디코더를 거쳐 원본 이미지로 복구하는 작업을 합니다.
오토인코더 모델은 인코더 - 디코더의 결합된 형태로 만들어집니다.
나중에 디코더만 따로 떼네어, 압축된 정보를 입력으로 주게 되면, 알아서 원본 이미지와 유사한 마치 Fake 이미지를 만들어 주도록 유도할 수도 있습니다.
오차 (Loss) 와 학습 (Fit)
오토인코더의 손실은 MNIST의 28 X 28 이미지 각각의 pixel 값에 대하여 원본 - 디코딩된 이미지 간의 MSE 오차를 적용하여 학습합니다.
학습데이터 또한, 원본이미지를 그대로 label 이미지로 활용합니다. 왜냐하면, Input Data와 Output Data 간의 차이를 줄이는데에 모델의 성능이 달려 있습니다. 오차를 줄이면 줄일 수록 복원되는 이미지는 원본이미지에 가깝게 복원됩니다.
비지도학습 (특징 추출)
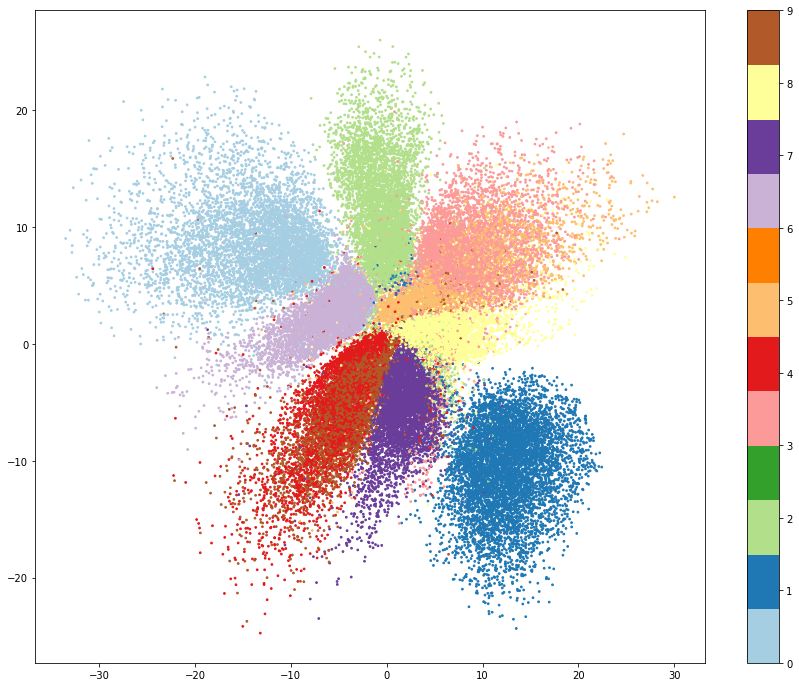
인코더가 특징을 추출하여 2D 캔버스위에 시각화 (2개의 Feature로 압축)

인코더를 통하여 X, Y 좌표형식으로 특징 추출을 한 뒤 그래프에 시각화한 모습입니다.
마치 PCA를 통한 차원 축소를 하게 되면 다음과 같은 모습을 볼 수 있습니다. 하지만, PCA는 Vector연산을 통하여 특징 추출을 하고 그치는 반면, 오토인코더는 디코더를 통해 축소된 정보를 다시 복원시킬 수 있다는 점입니다.
군집화된 데이터를 통해 어떤 임의의 데이터가 이를 확연히 벗어난다면, 해당 데이터는 잘못된 데이터 (Fraud)로 판단해 볼 수도 있을 것 같습니다.
오토인코더의 인코더를 따로 떼내어, 수많은 feature들이 존재할 시에 압축된 데이터로 줄여주는 일종의 차원 축소 역할을 하도록 만들 수 있습니다.
Import
from tensorflow.keras.layers import Conv2D, Conv2DTranspose, Dense, Flatten, Dropout, BatchNormalization, Reshape, LeakyReLU
from tensorflow.keras.models import Model, Sequential
from tensorflow.keras.callbacks import ModelCheckpoint
import tensorflow as tf
MNIST 데이터를 불러옵니다.
mnist = tf.keras.datasets.mnist
(x_train, y_train), (x_valid, y_valid) = mnist.load_data()
x_train.shape, y_train.shape
28 X 28 X 1로 shape를 변경합니다.
x_train = x_train.reshape(-1, 28, 28, 1)
x_train을 Normalization 해줍니다. -1 ~ 1 사이의 값을 가집니다.
(이는 나중에 마지막 출력층 activation에서 sigmoid말고 tanh를 사용하기 위함입니다.
x_train = x_train / 127.5 - 1
x_train.min(), x_train.max()
Encoder를 정의합니다.
encoder_input = Input(shape=(28, 28, 1))

# 28 X 28
x = Conv2D(32, 3, padding='same')(encoder_input)
x = BatchNormalization()(x)
x = LeakyReLU()(x)

# 28 X 28 -> 14 X 14
x = Conv2D(64, 3, strides=2, padding='same')(x)
x = BatchNormalization()(x)
x = LeakyReLU()(x)

# 14 X 14 -> 7 X 7
x = Conv2D(64, 3, strides=2, padding='same')(x)
x = BatchNormalization()(x)
x = LeakyReLU()(x)

# 17 X 7
x = Conv2D(64, 3, padding='same')(x)
x = BatchNormalization()(x)
x = LeakyReLU()(x)

x = Flatten()(x)

# 2D 좌표로 표기하기 위하여 2를 출력값으로 지정합니다.
encoder_output = Dense(2)(x)
Encoder 모델 정의
encoder = Model(encoder_input, encoder_output)
encoder.summary()
Decoder
# Input으로는 2D 좌표가 들어갑니다.
decoder_input = Input(shape=(2, ))

# 2D 좌표를 7*7*64 개의 neuron 출력 값을 가지도록 변경합니다.
x = Dense(7*7*64)(decoder_input)
x = Reshape( (7, 7, 64))(x)

# 7 X 7 -> 7 X 7
x = Conv2DTranspose(64, 3, strides=1, padding='same')(x)
x = BatchNormalization()(x)
x = LeakyReLU()(x)

# 7 X 7 -> 14 X 14
x = Conv2DTranspose(64, 3, strides=2, padding='same')(x)
x = BatchNormalization()(x)
x = LeakyReLU()(x)

# 14 X 14 -> 28 X 28
x = Conv2DTranspose(64, 3, strides=2, padding='same')(x)
x = BatchNormalization()(x)
x = LeakyReLU()(x)

# 28 X 28 -> 28 X 28
x = Conv2DTranspose(32, 3, strides=1, padding='same')(x)
x = BatchNormalization()(x)
x = LeakyReLU()(x)

# 최종 output
decoder_output = Conv2DTranspose(1, 3, strides=1, padding='same', activation='tanh')(x)
Decoder 모델 정의
decoder = Model(decoder_input, decoder_output)
decoder.summary()
Hyperparameter 정의
LEARNING_RATE = 0.0005
BATCH_SIZE = 32
Encoder와 Decoder를 연결합니다.
encoder_in = Input(shape=(28, 28, 1))
x = encoder(encoder_in)
decoder_out = decoder(x)
Auto Encoder 모델을 최종 정의합니다.
auto_encoder = Model(encoder_in, decoder_out)
Auto Encoder 모델을 compile 합니다.
optimizer는 Adam, loss는 MSE 에러를 가지도록 합니다.
auto_encoder.compile(optimizer=tf.keras.optimizers.Adam(LEARNING_RATE), loss=tf.keras.losses.MeanSquaredError())
체크포인트를 정의합니다.
checkpoint_path = 'tmp/01-basic-auto-encoder-MNIST.ckpt'
checkpoint = ModelCheckpoint(checkpoint_path,
                             save_best_only=True,
                             save_weights_only=True,
                             monitor='loss',
                             verbose=1)
학습을 시작합니다.
auto_encoder.fit(x_train, x_train,
                 batch_size=BATCH_SIZE,
                 epochs=100,
                 callbacks=[checkpoint],
                )
auto_encoder.load_weights(checkpoint_path)
시각화
import matplotlib.pyplot as plt

%matplotlib inline
# MNIST 이미지에 대하여 x, y 좌표로 뽑아냅니다.
xy = encoder.predict(x_train)
xy.shape, y_train.shape
인코더의 X, Y 좌표 값을 시각화 해보겠습니다.
plt.figure(figsize=(15, 12))
plt.scatter(x=xy[:, 0], y=xy[:, 1], c=y_train, cmap=plt.get_cmap('Paired'), s=3)
plt.colorbar()
plt.show()
Auto Encoder를 통한 이미지 재생성 성능 비교 시각화
decoded_images = auto_encoder.predict(x_train)
fig, axes = plt.subplots(3, 5)
fig.set_size_inches(12, 6)
for i in range(15):
    axes[i//5, i%5].imshow(x_train[i].reshape(28, 28), cmap='gray')
    axes[i//5, i%5].axis('off')
plt.tight_layout()
plt.title('Original Images')
plt.show()

fig, axes = plt.subplots(3, 5)
fig.set_size_inches(12, 6)
for i in range(15):
    axes[i//5, i%5].imshow(decoded_images[i].reshape(28, 28), cmap='gray')
    axes[i//5, i%5].axis('off')
plt.tight_layout()
plt.title('Auto Encoder Images')
plt.show()
정리
- 첫번째 디코딩 된 이미지를 보면, 원본 이미지는 5이나, decoder 이미지는 3처럼 보인다. (3번째도 원래 4인데 9처럼 디코딩 되었다)
- 전체적으로 이미지 재구성에 대한 성능은 뛰어난 편이다.
- Decoder만 따로 떼내어, 임의의 X, Y 좌표를 넣어 주는 것으로 이미지를 새로 만들어 낼 수도 있다.
댓글남기기