🔥알림🔥
① 테디노트 유튜브 -
구경하러 가기!
② LangChain 한국어 튜토리얼
바로가기 👀
③ 랭체인 노트 무료 전자책(wikidocs)
바로가기 🙌
④ RAG 비법노트 LangChain 강의오픈
바로가기 🙌
⑤ 서울대 PyTorch 딥러닝 강의
바로가기 🙌
Google Colaboratory에 대한 간단 팁과 활용법
이번 포스팅에서는 Google Colaboratory (colab)을 활용하여 jupyter notebook을 구글 플랫폼 내에서 활용하는 방법에 대하여 팁을 드리도록 하겠습니다.
Colaboratory는 구글 내부에서 활용하기 위해 만들어진 툴인데, 일반 사용자들에게 오픈되어 브라우져 상에서 machine learning (deep learning)을 학습할 수 있도록 해주는 구글 플랫폼입니다. 일단 가장 큰 장점은 무료이구요.
또 하나의 장점은, 하이엔드 GPU가 달린 데스크톱 없이 구글의 CPU/RAM/GPU를 활용하여 보다 빠르게 Training Data를 학습시킬 수 있다는 점입니다.
Colaboratory 환경
- CPU: Intel (R) Xeon(R) CPU @ 2.30GHz (Dual-Core)
- GPU: Nvidia Tesla K80 혹은 Nvidia Tesla P100
- GPU Memory: 12GB (K80) / 16GB (P100)
- VM 지속시간: 12시간
무려 Xeon CPU에 Tesla GPU 환경을 이용할 수 있다는 것이 가장 큰 매력이 아닐까 합니다.
실제 CPU에서만 training 해볼때와 GPU boosting 했을 때 그 차이가 10배~45배정도 나더군요.
직접 테스트 해볼 수 있는 소스코드도 공유 해 드리겠습니다. (Google Colab 튜토리얼에 나와있습니다)
import tensorflow as tf
device_name = tf.test.gpu_device_name()
if device_name != '/device:GPU:0':
  raise SystemError('GPU device not found')
print('Found GPU at: {}'.format(device_name))

# Found GPU at: /device:GPU:0
성능 비교를 해볼까요?
import tensorflow as tf
import timeit

# See https://www.tensorflow.org/tutorials/using_gpu#allowing_gpu_memory_growth
config = tf.ConfigProto()
config.gpu_options.allow_growth = True

with tf.device('/cpu:0'):
  random_image_cpu = tf.random_normal((100, 100, 100, 3))
  net_cpu = tf.layers.conv2d(random_image_cpu, 32, 7)
  net_cpu = tf.reduce_sum(net_cpu)

with tf.device('/gpu:0'):
  random_image_gpu = tf.random_normal((100, 100, 100, 3))
  net_gpu = tf.layers.conv2d(random_image_gpu, 32, 7)
  net_gpu = tf.reduce_sum(net_gpu)

sess = tf.Session(config=config)

# Test execution once to detect errors early.
try:
  sess.run(tf.global_variables_initializer())
except tf.errors.InvalidArgumentError:
  print(
      '\n\nThis error most likely means that this notebook is not '
      'configured to use a GPU.  Change this in Notebook Settings via the '
      'command palette (cmd/ctrl-shift-P) or the Edit menu.\n\n')
  raise

def cpu():
  sess.run(net_cpu)

def gpu():
  sess.run(net_gpu)

# Runs the op several times.
print('Time (s) to convolve 32x7x7x3 filter over random 100x100x100x3 images '
      '(batch x height x width x channel). Sum of ten runs.')
print('CPU (s):')
cpu_time = timeit.timeit('cpu()', number=10, setup="from __main__ import cpu")
print(cpu_time)
print('GPU (s):')
gpu_time = timeit.timeit('gpu()', number=10, setup="from __main__ import gpu")
print(gpu_time)
print('GPU speedup over CPU: {}x'.format(int(cpu_time/gpu_time)))

sess.close()
결과는..10배 정도 boost 되었다고 나왔네요!
Tesla GPU가 엄청나긴 엄청납니다..가격도 후덜덜하죠..
Time (s) to convolve 32x7x7x3 filter over random 100x100x100x3 images (batch x height x width x channel). Sum of ten runs.
CPU (s):
9.76411700249
GPU (s):
0.909692049026
GPU speedup over CPU: 10x
Colaboratory를 사용하기 전에 주의할 점!
앞서 장점에 대해서 언급했습니다만, 단점이 없는 것은 아닙니다.
Colaboratory는 docker로 돌아가기 때문에, 내가 설치한 새로운 환경 패키지, 샘플 데이터등이 언제든지 날라갈 수 있다는 점입니다. 물론, 내가 작업하고 있는 notebook은 Drive 에 저장할 수 있습니다. 즉, 소스코드는 보존이 가능하나 그 안에서 돌리는 다운로드 받은 샘플데이터나 weight, 변수 등등의 값들은 날아갈 수 있다는 점 꼭 유의하시기 바랍니다.
그래서, 이러한 점들을 보완하기 위해 저는 Google Drive에 용량이 큰 샘플데이터를 미리 업로드 해 놓고, Colaboratory에서 작업할 때는 Drive에서 샘플데이터를 불러와 학습시키고 있습니다.
그럼 시작해볼까?
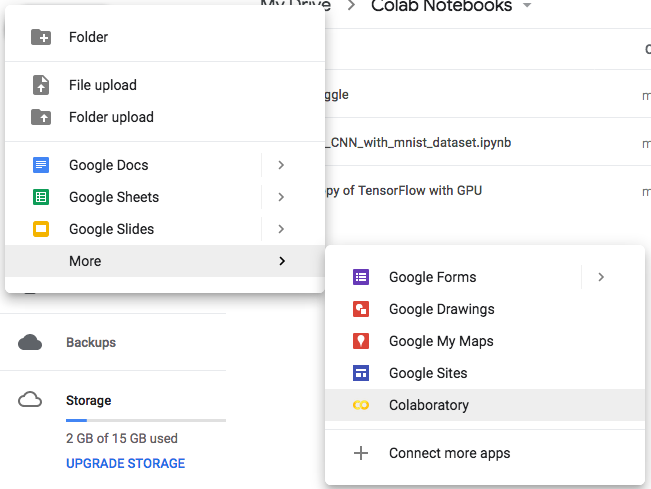
Colaboratory에서 notebook파일을 만드는 것은 매우 간단합니다.
저와 같은 경우는, Google Drive에서 +New - More - Colaboratory로 바로 생성합니다.
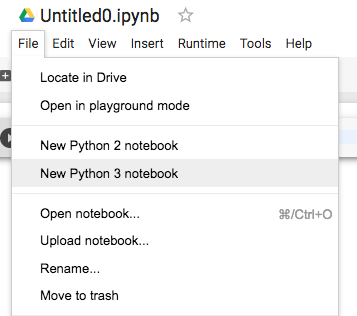
Jupyter Notebook과 환경은 거의 같습니다. 다만, 저는 단축키가 조금 달라 은근히 애를 먹었습니다.
File 탭에 보시면 Python버젼을 2를 쓸 것인지 3을 쓸 것인지 선택할 수 있습니다.
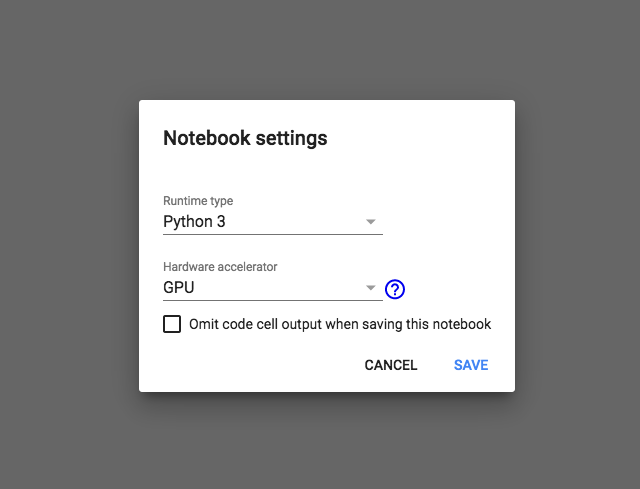
그리고, 가장 중요한 설정인 GPU는
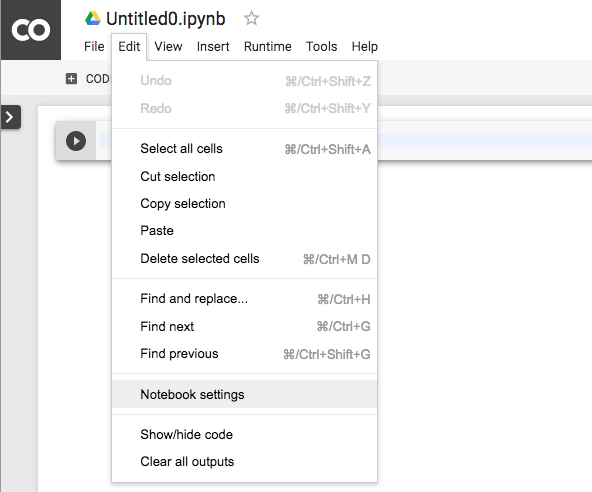
Edit - Notebook settings 에서 하실 수 있습니다.
Drive, GitHub, 로컬에 백업 및 공유하기
또하나 Colaboratory가 굉장히 마음에 들었던 부분은 손쉬운 공유입니다.
보통 로컬에서 작업한 파일을 GitHub에 Push해야 하는 경우가 많습니다. Colaboratory에서는 Save a copy in GitHub 버튼만 누르면 바로 repository에 push 해 줍니다. 또한, Drive에 save됨은 물론이고 (어차피 Drive에서 New로 생성했다면 자동 저장 됩니다) local PC로 .ipynb 혹은 .py파일로 다운로드 받을 수 있습니다.
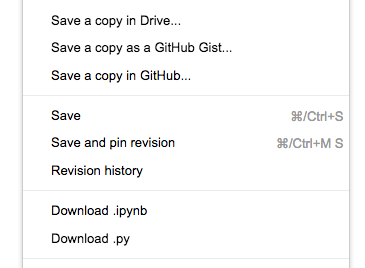
위 캡처화면에서 보시면 Revision history도 나오는데, 내가 변경한 소스코드의 history도 보여줍니다..역시 구글신..
GitHub에 커밋된 notebook을 colab에서 바로 열고 실행하기
GitHub에 커밋된 소스를 colab 에서 매우 쉽게 바로 열 수 있습니다.
주소만 바꾸어 주면 되는데요
예를 들어,
https://github.com/teddylee777/machine-learning/blob/master/TensorFlow/05_Convolution_Neural_Network_With_Mnist_Dataset.ipynb
https://colab.research.google.com/github/teddylee777/machine-learning/blob/master/TensorFlow/05_Convolution_Neural_Network_With_Mnist_Dataset.ipynb
주소만 이렇게 바꾸어 주면 colab에서 바로 열어 볼 수 있습니다!
Google Drive에 저장한 Sample Data로 Training 하기
앞서, Colaboratory의 거의 유일한 단점인 샘플 데이터가 날라갈 수 있다는 점을 언급했습니다. 트레이닝한 모델에 대해서는 model save를 통해 나중에 복구할 수 있다고는 하지만, 몇 Mb가 되는 샘플데이터를 매번 업로드 해야 하는데, Colaboratory에 file 업로드 하는 기능이 있기는 하지만…
30Mb의 샘플데이터를 업로드 하는데만 1시간이 넘게 걸려도 되지 않았습니다… 왜이렇게 오래 걸리는 지는 모르겠습니다..
그래서 Google Drive에 미리 업로드 해놓은 Sample data를 load해서 트레이닝 하는 방법을 공유드리겠습니다.
- Sample data를 Drive 상의 임의의 폴더를 만들어 업로드 시켜 놓습니다.
-
당 폴더의 id 값을 알아야 하는데 이는 주소창에서 ‘https://drive.google.com/drive/folders/’ 뒤에 붙는 값입니다.

이경우는 id 값이 ‘1XknZ3828-a0ALIM06yjgglddTJ’ 가 되겠네요. 폴더의 id 값을 잘 저장해 놓습니다.
-
Google Drive api를 활용하기 위하여 PyDrive package를 인스톨 합니다.
!pip install -U -q PyDrive -
Auth 승인을 받습니다.
from pydrive.auth import GoogleAuth from pydrive.drive import GoogleDrive from google.colab import auth from oauth2client.client import GoogleCredentials # PyDrive Authentication auth.authenticate_user() gauth = GoogleAuth() gauth.credentials = GoogleCredentials.get_application_default() drive = GoogleDrive(gauth) -
Folder Id로 FileList 받아오기
folder_id = '1XknZ3828-a0ALIM06yjgglddTJ' def ListFolder(parent): filelist=[] file_list = drive.ListFile({'q': "'%s' in parents and trashed=false" % parent}).GetList() for f in file_list: if f['mimeType']=='application/vnd.google-apps.folder': # if folder filelist.append({"id":f['id'],"title":f['title'],"list":ListFolder(f['id'])}) else: filelist.append({"title":f['title'],"id":f['id']}) return filelist file_lists = ListFolder(folder_id) -
Local (colaboratory) directory 지정
# choose a local (colab) directory to store the data. local_download_path = os.path.expanduser('~/my_sample_data') try: os.makedirs(local_download_path) except: pass -
Filename 저장
ret = [] for file in file_lists: print('title: %s, id: %s' % (file['title'], file['id'])) fname = os.path.join(local_download_path, file['title']) print('downloading to {}'.format(fname)) f_ = drive.CreateFile({'id': file['id']}) f_.GetContentFile(fname) print(fname) ret.append(fname) -
pandas에서 read_csv 로 load
import pandas as pd
pd.read_csv(ret[0])
코드를 종합해보면 이렇게 되겠네요
# code for importing samples from Google Drive
!pip install -U -q PyDrive

from pydrive.auth import GoogleAuth
from pydrive.drive import GoogleDrive
from google.colab import auth
from oauth2client.client import GoogleCredentials
import os

# PyDrive Authentication
auth.authenticate_user()
gauth = GoogleAuth()
gauth.credentials = GoogleCredentials.get_application_default()
drive = GoogleDrive(gauth)

# define folder id
folder_id = '1XknZwYTI-EbO5JEtwa0ALIM06yjOadTJ'

# file_lists will be my list of files from folder
file_lists = []

# get lists of files from Google Drive folder
def ListFolder(parent):
    filelist=[]
    file_list = drive.ListFile({'q': "'%s' in parents and trashed=false" % parent}).GetList()
    for f in file_list:
        if f['mimeType']=='application/vnd.google-apps.folder': # if folder
            filelist.append({"id":f['id'],"title":f['title'],"list":ListFolder(f['id'])})
        else:
            filelist.append({"title":f['title'],"id":f['id']})
    return filelist

file_lists_from_drive = ListFolder(folder_id)

# choose a local (colab) directory to store the data.
local_download_path = os.path.expanduser('~/my_sample_data')
try:
    os.makedirs(local_download_path)
except: pass

for file in file_lists_from_drive:
    print('title: %s, id: %s' % (file['title'], file['id']))
    fname = os.path.join(local_download_path, file['title'])
    print('downloading to {}'.format(fname))
    f_ = drive.CreateFile({'id': file['id']})
    f_.GetContentFile(fname)
    print(fname)
    file_lists.append(fname)

# print file lists
print(file_lists)
마무리
Google Colaboratory는 Jupiter notebook에 GPU부스팅을 받을 수 있다는 큰 이점이 있습니다. Kaggle을 할 때 유용하게 쓰일 것 같다. 앞으로 점점 colab플랫폼을 활용하는 사용자들이 늘어날 것 같습니다. (물론 이미 장비를 갖춘 사람이라면 필요 없겠지만..) 아무튼, 이제 막 machine-learning / deep-learning 을 시작하는 입문자들에게는 최고의 tool이 아닐까 생각합니다.
Colaboratory 튜토리얼 페이지에서 더욱 자세한 내용들을 확인할 수 있습니다.
[참고 문헌] Colaboratory’s Free GPU
댓글남기기